If you're interested in training the next large transformer like DALL-E, Imagen, or BERT, a single GPU (or even single 8x GPU instance!) might not be enough compute to minimize your training loss before the heat death of the universe!
This blog is about setting up a Run:AI cluster on Lambda Cloud with one or multiple cloud instances. By the end of this blog, you will have learned:
- How to spin up Lambda Cloud instances with persistent storage
- How to stand up a Kubernetes cluster on Lambda Cloud
- How to install Run:AI on the cluster
- How to scale up/down the cluster
Here are some nice features about using Lambda Cloud as the infrastructure:
- Super easy to add/remove nodes
- All nodes can share the same persistent storage Lambda Cloud offers.
- The head node itself can be used as a GPU compute node – allows a single-node cluster setup.
We hope this article can be a valuable resource for those who are exploring k8s based MLOps platforms, or considering a migration of their existing solution from on-prem to the cloud.
Goal
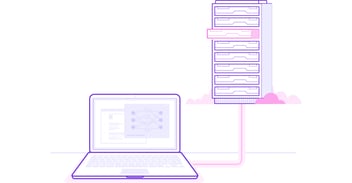
We will cluster up several of Lambda Cloud instances
into this

so we can have this
Without further adieu, let's dive into the process.
Set up Guide
- Spin up a Lambda Cloud instance as the head node
- Spin up a k8s cluster
2.1. Docker and nvidia-container-runtime
2.2. Stand up a k8s cluster - Install Run:AI
- Add and remove nodes
- Tear down the cluster
Spin up a Lambda Cloud instance as the head node
We start by creating a single-GPU Lambda Cloud instance. It will be used as the head node of the cluster.
It only takes a few clicks to create a Lambda Cloud instance. Also remember to follow this guide to create a cloud storage and attach it to the instance (free for up to 10TB in our beta test). Here we just created a gpu.1x.a6000 instance and attach a Lambda Cloud Storage called ml to the instance at /home/ubuntu/ml
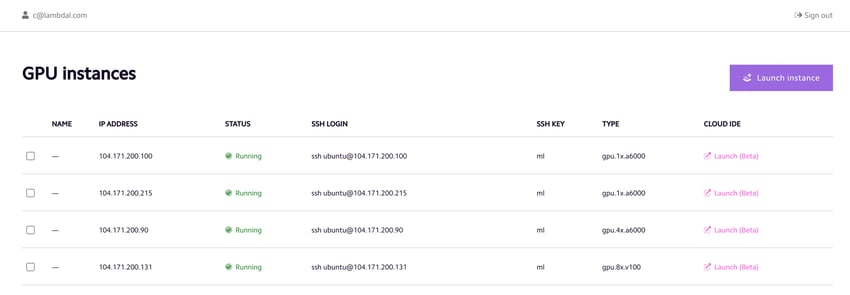
Here is the dashboard showing a gpu.1x.a6000 instance is running:
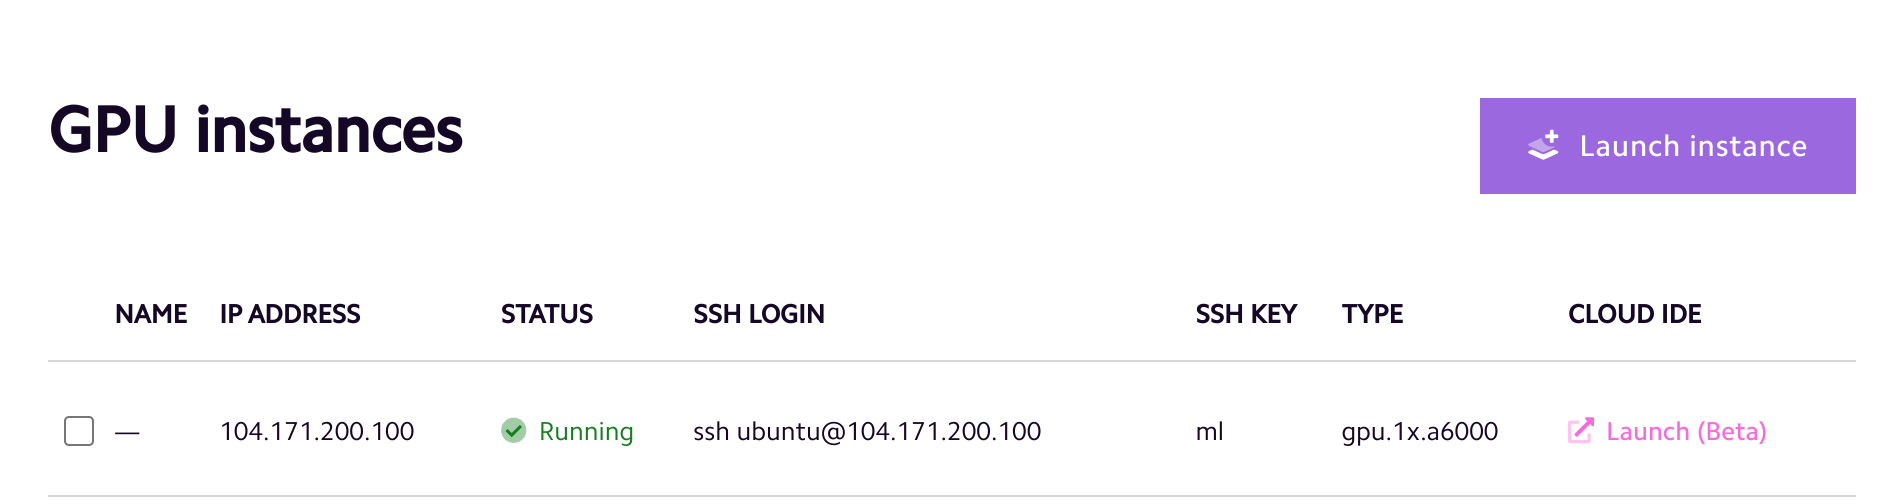
You can ssh into the instance and check the storage ml is mounted at the home directory:
ubuntu@104-171-200-100:~$ ls
ml
Spin up a k8s cluster
Next, we ssh into this instance (104-171-200-100), and set it up as the head node for a k8s cluster. The steps listed below are customized for Lambda cloud instances, which already have NVIDIA driver installed.
Docker and nvidia-container-runtime
Before doing anything, comment out the line in /etc/apt/sources.list.d/lambda-repository.list – this helps install the specific version of docker/nvidia-container-runtime later required by Run:AI.
# deb http://archive.lambdalabs.com/ubuntu focal main
# deb-src http://archive.lambdalabs.com/ubuntu focal main
Then run the following commands to install nvidia-container-runtime
curl -s -L https://nvidia.github.io/nvidia-container-runtime/gpgkey | \
sudo apt-key add - && \
distribution=$(. /etc/os-release;echo $ID$VERSION_ID) && \
curl -s -L https://nvidia.github.io/nvidia-container-runtime/$distribution/nvidia-container-runtime.list | \
sudo tee /etc/apt/sources.list.d/nvidia-container-runtime.list && \
sudo apt-get update && \
sudo apt-get install nvidia-container-runtime
Now, create a /etc/docker/daemon.json file and add the following lines to it:
{
    "exec-opts": ["native.cgroupdriver=systemd"],
    "default-runtime": "nvidia",
        "runtimes": {
        "nvidia": {
            "path": "nvidia-container-runtime",
            "runtimeArgs": []
        }
    }
}
The reason for using this configuration is
- The
systemddriver is recommended for kubeadm based setups instead of thecgroupfsdriver, because kubeadm manages the kubelet as a systemd service. - It also tells docker to use
nvidia-container-runtime(should installed at/usr/bin/nvidia-container-runtimeif you follow the above steps)
Last, restart docker service
sudo systemctl restart docker
You can run the following test to see if GPU can be used in the nvidia/cuda:10.0-base container:
sudo docker run --gpus all nvidia/cuda:10.0-base nvidia-smi

+-----------------------------------------------------------------------------+
| NVIDIA-SMI 510.60.02 Driver Version: 510.60.02 CUDA Version: 11.6 |
|-------------------------------+----------------------+----------------------+ | GPU  Name        Persistence-M| Bus-Id Disp.A | Volatile Uncorr. ECC | | Fan  Temp  Perf  Pwr:Usage/Cap| Memory-Usage | GPU-Util  Compute M. | |                               | |               MIG M. | |===============================+======================+======================| |   0  NVIDIA RTX A6000    On   | 00000000:06:00.0 Off |                  Off | | 30%   40C    P8    19W / 300W | 3MiB / 49140MiB |      0%      Default | |                               | |                  N/A | +-------------------------------+----------------------+----------------------+ +-----------------------------------------------------------------------------+ | Processes:                                                                  | |  GPU   GI   CI        PID   Type   Process name                  GPU Memory | |        ID   ID                                                   Usage      | |=============================================================================| |  No running processes found                                                 | +-----------------------------------------------------------------------------+
Stand up a k8s cluster
Creating a k8s cluster on Lambda Cloud is very easy. We group the commands to do so based on whether they need to be run on all the nodes, or only on the head node.
First, these are the commands that need to be run on all nodes
sudo sh -c 'cat <<EOF > /etc/sysctl.d/k8s.conf net.bridge.bridge-nf-call-ip6tables = 1 net.bridge.bridge-nf-call-iptables = 1 net.ipv4.ip_forward = 1 EOF' && \
sudo apt-get update && sudo apt-get install -y apt-transport-https curl && \
curl -s https://packages.cloud.google.com/apt/doc/apt-key.gpg | sudo apt-key add - && \ sudo sh -c 'cat <<EOF | sudo tee /etc/apt/sources.list.d/kubernetes.list
deb https://apt.kubernetes.io/ kubernetes-xenial main
EOF' && \ sudo apt-get update && \ sudo apt-get install -y kubelet=1.21.4-00 kubeadm=1.21.4-00 kubectl=1.21.4-00 && \ sudo swapoff -a
These commands install the Kubernetes tools without actually standing up the cluster – obviously you need the tools on all nodes, but only use the head node to run extra commands to stand up a cluster. Notice we pin the version of the software to 1.21.4 because that is the latest version supported by Run:AI when this tutorial is written (May 2022).
Now, the commands only need to be run on the head node. First, we will initialize a k8s control-plane node:
sudo kubeadm init --pod-network-cidr=10.244.0.0/16 --kubernetes-version=v1.21.4 --token-ttl 180h
you will see something like this in the output.
kubeadm join 104.171.200.100:6443 --token xxxxxxxxxxxxxxxxxxx --discovery-token-ca-cert-hash sha256:xxxxxxxxxxxxxxxxxxxxxxxxxxxxxxxxxxxxxxxxxxxxThis is the command to add a worker node to the cluster. Save it for later (use it on the worker node).
Now run these command and you should have a k8s cluster up running
mkdir .kube && \
sudo cp -i /etc/kubernetes/admin.conf .kube/config && \
sudo chown $(id -u):$(id -g) .kube/config && \
kubectl apply -f https://raw.githubusercontent.com/coreos/flannel/master/Documentation/kube-flannel.yml
To check if the cluster is running, try this
ubuntu@104-171-200-100:~$ kubectl get nodes
NAME              STATUS                     ROLES                  AGE    VERSION
104-171-200-100   Ready                      control-plane,master   3h6m   v1.21.4
There are a few tweaks we need to do on the head node. First, we want to remove taint from the head node so it works as a single node cluster (otherwise you will get Error: failed pre-install: timed out waiting for the condition when you install Run:AI on the cluster)
kubectl taint nodes 104-171-200-100 node-role.kubernetes.io/master-Because we are creating a GPU cluster, we will install nvidia/gpu-operator via helm.
sudo snap install helm --classic && \
helm repo add nvidia https://helm.ngc.nvidia.com/nvidia && \
helm repo update && \
helm install --wait --generate-name \
     -n gpu-operator --create-namespace \
     nvidia/gpu-operator
Last, we need to install mpi-operator for distributed workloads. Again, some changes are needed to make it work with Run:AI
git clone https://github.com/kubeflow/mpi-operator && \
cd mpi-operator && \
git checkout tags/v0.2.3

# make changes to deploy/v1alpha2/mpi-operator.yaml
# search for mpioperator/mpi-operator:latest and change it to mpioperator/mpi-operator:v0.2.3
# search for mpioperator/kubectl-delivery:latest and change it to mpioperator/kubectl-delivery:v0.2.3
kubectl create -f deploy/v1alpha2/mpi-operator.yaml
Now, you have a Lambda Cloud instance that can be used as both a head node and a GPU worker node. Next, we will install Run:AI on it.
Install Run:AI
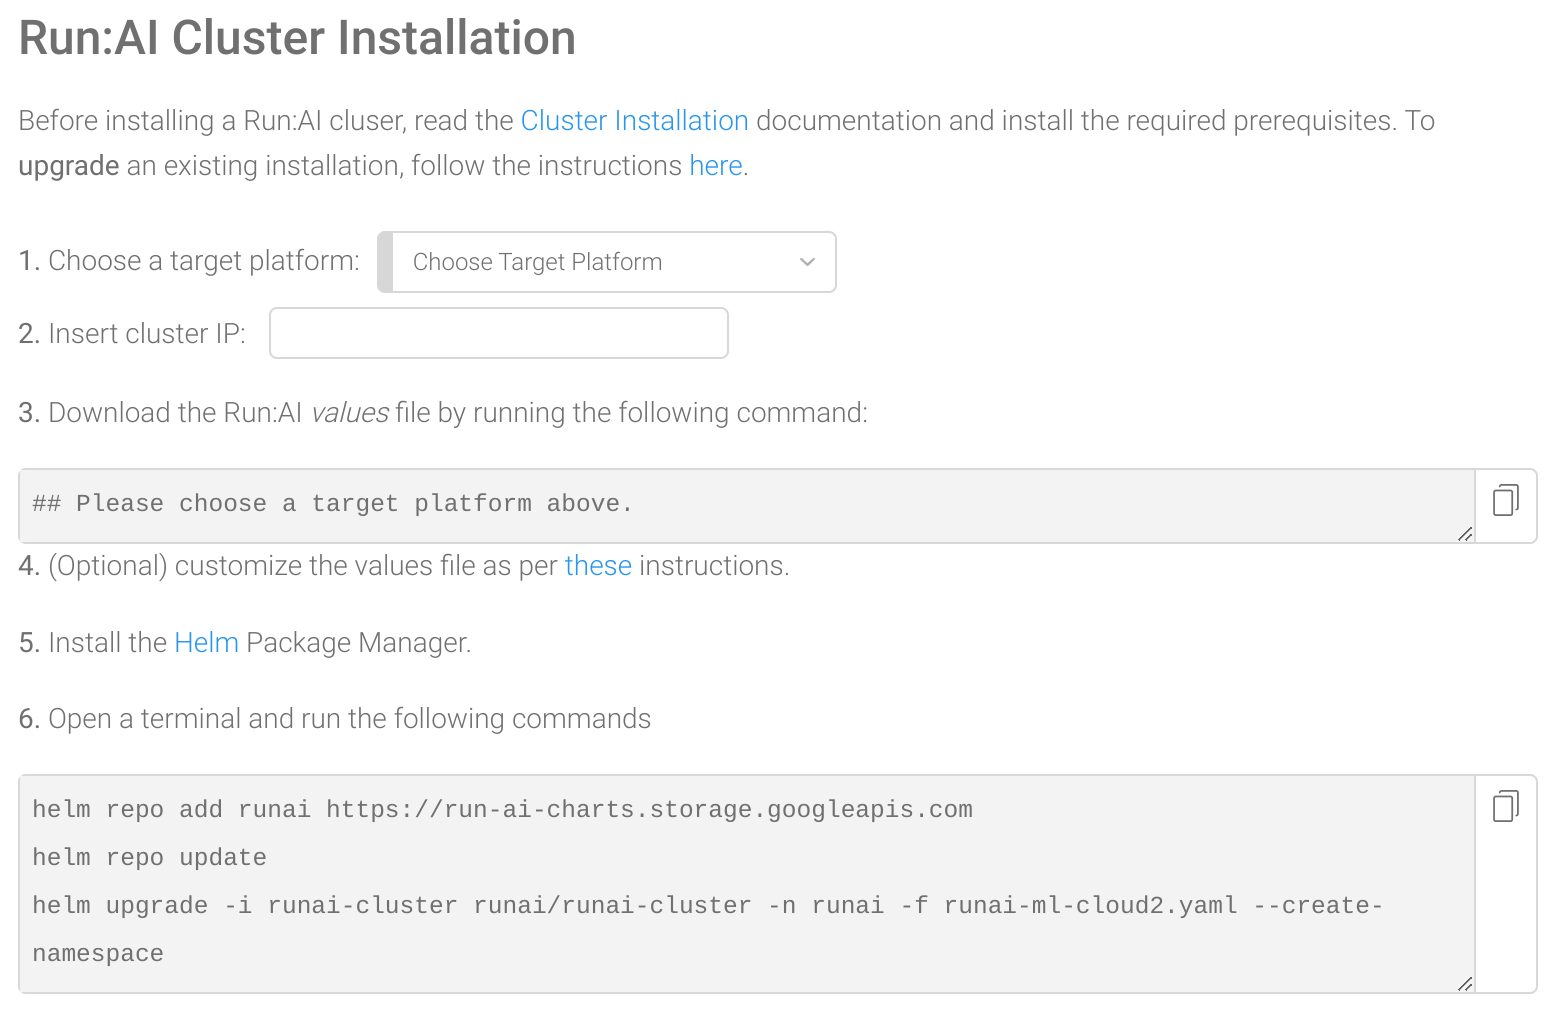
Follow the instruction here: log into your Run:AI web user interface, go to Clusters/New Cluster) and use their wizard to create a new cluster. For Lambda Cloud – choose On Premise as the target platform, insert the IP of the head node and run steps 3 and 6 to download the values file and execute the installation. Notice you need a Run:AI tenant for logging into to the Run:AI web interface and use the following installation wizard. Talk to a Lambda engineer on our reserved cloud page and we can help you setting up the Run:AI tenant.
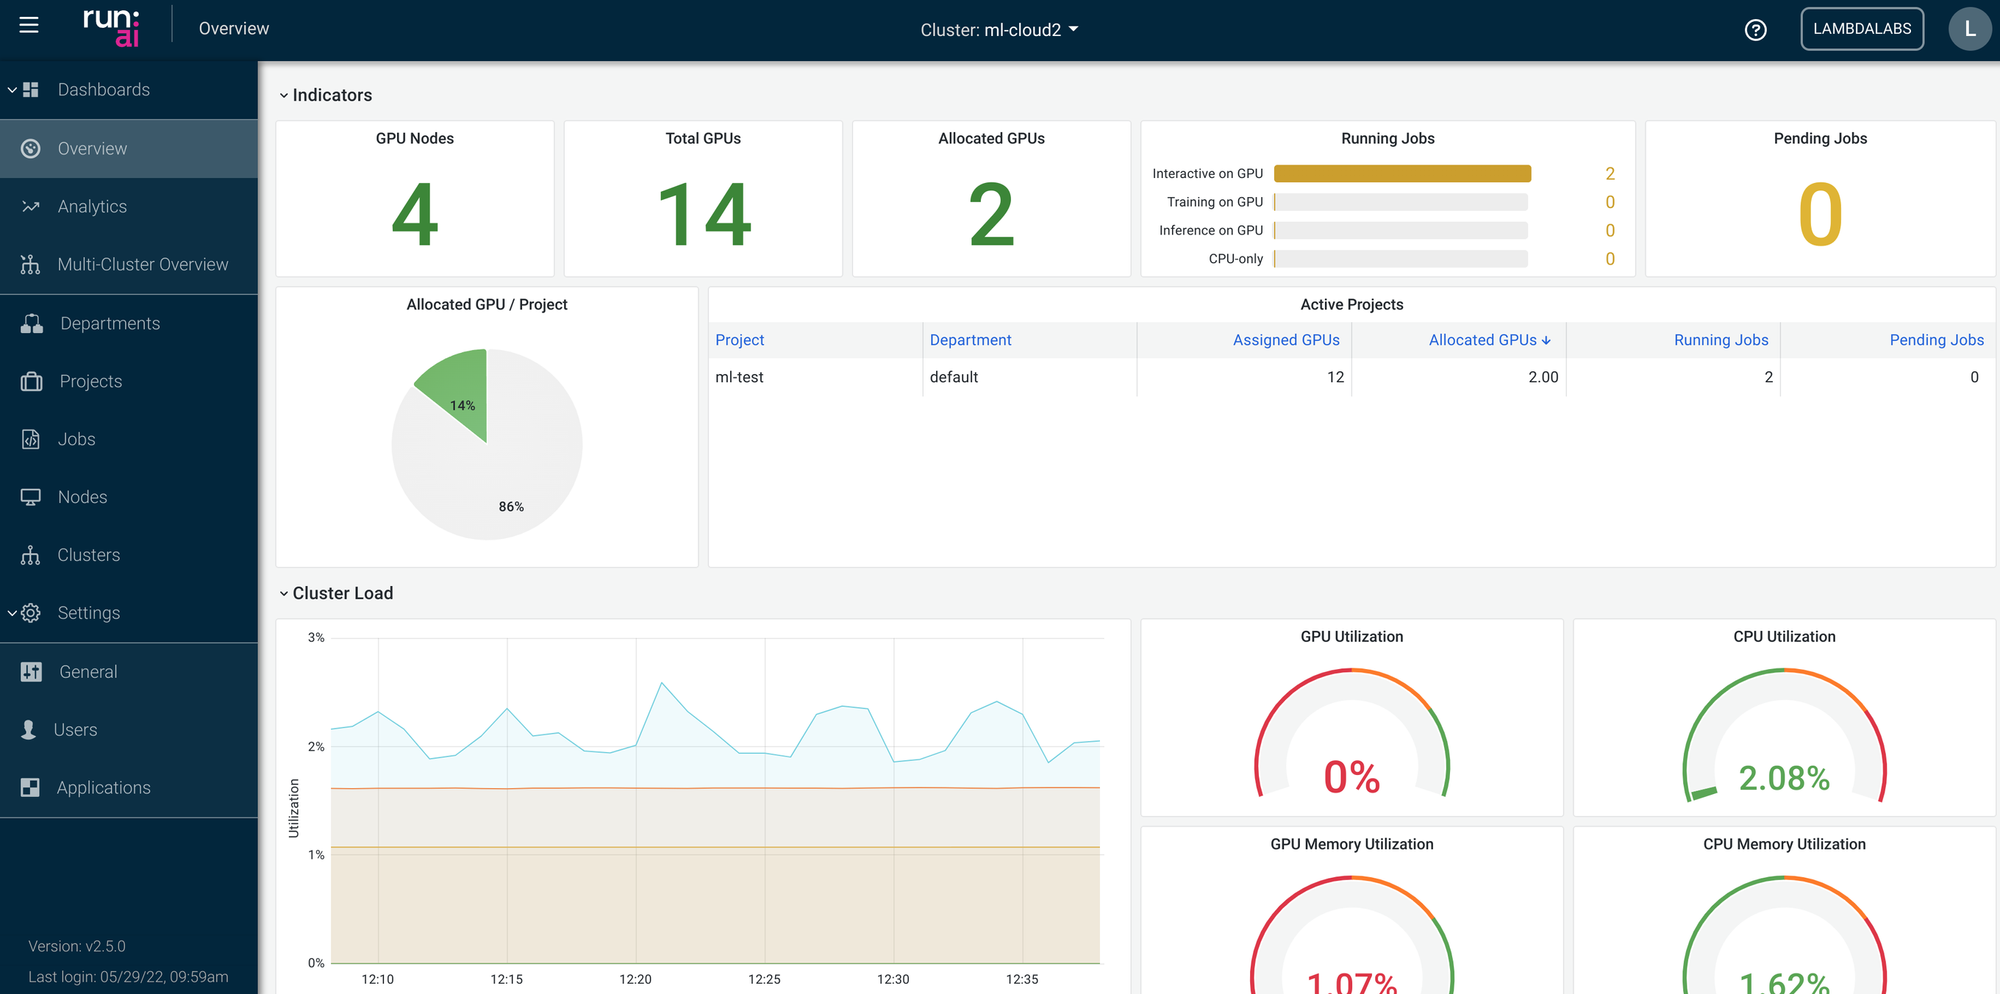
If everything goes well, you should see your cluster (we named it ml-cloud2) up and running in the Run:AI dashboard in a minute or two.
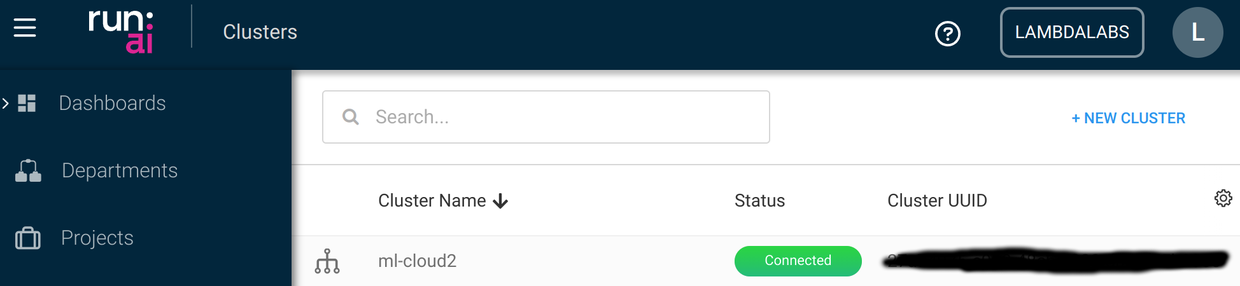
You should also see there is a GPU on the head node, meaning you can use it to launch GPU jobs.

Add and remove nodes
Adding new worker (computing) nodes to the cluster is super easy. First, you need to create a new Lambda Cloud instance and attach the same storage to it (otherwise the storage can not be successfully mounted when you submit a Run:AI job with the -v option).
As an exmaple, we launch another gpu.1xa6000 Lambda Cloud instance and it has the IP 104.171.200.215:

To add this instance to the Run:AI cluster, you first ssh into this new instance
-
Repeat the above docker/nvidia-docker-runtime installation
-
Repeat the above commands for “all nodes“ in the Stand up a k8s cluster step (start from sudo sh -c 'cat < /etc/sysctl.d/k8s.conf ... and finish with sudo swapoff -a )
And finally, run the previously saved kubeadm join command with sudo to add the node to the cluster:
sudo kubeadm join 104.171.200.100:6443 --token xxxxxxxxxxxxxxxxxxx --discovery-token-ca-cert-hash sha256:xxxxxxxxxxxxxxxxxxxxxxxxxxxxxxxxxxxxxxxxxxxx
That’s it! After a minute or so you should see the node in your Run:AI dashboard:

You can add more Lambda Cloud instances to the cluster. Here we add a gpu.4x.a6000 instance and a gpu.8x.v100 instance to the cluster – no problem at all.

To remove a node, the best practice is to first remove it from the k8s cluster, then terminate it as Lambda Cloud instance (if you wish so). The commands (executed on the head node) for removing a worker node from a k8s cluster are
kubectl drain <node-name> --ignore-daemonsets --delete-emptydir-data
kubectl delete node <node-name>
Where <node-name> is the name of the worker node you want to remove. Now you can terminate the removed instance in Lambda Cloud’s dashboard.
If you want to add the worker node back to the cluster, just ssh into the worker node, run sudo kubeadm reset -f and run the above sudo kubeadm join again. The reset is necessary otherwise the join process will complain services is in use.
Tear down the cluster
Similar to removing a single node, just do it one by one with the head node being the last one to be removed.
After the head node is deleted, you should run sudo kubeadm reset -f and remove the kube config file rm -r ~/.kube on from it.
Summary
This blog gives a detailed walkthrough of how to set up a multi-node Run:AI cluster on Lambda Cloud. The biggest benefits of using Lambda Cloud as the underlying infrastructure are
- Scaling up and down the number of nodes is very easy.
- the persistent storage offered by Lambda Cloud make it super straight forward to share data, code, model, even python virtual environments across all the nodes.
- All nodes are GPU equipped, including the head node which by itself can be used as a single node, multi-GPU cluster.
Footnotes
1. If you have a pre-canned pipeline of standing up a k8s cluster, please be aware that some changes may be needed for a smooth experience with both Lambda Cloud and Run:AI. For example, if you would like to use DeepOps, you may want to skip the NVIDIA driver installation (already installed on Lambda Cloud instances), and make sure GPU feature discovery, device plugin, and NVIDIA GPU Operator are installed only once by either DeepOps or Run:AI.