PyTorch is designed to be the framework that's both easy to use and delivers performance at scale. Indeed it has become the most popular deep learning framework by a mile among the research community. However, despite some lengthy official tutorials and a few helpful community blogs, it is not always clear what exactly has to be done to make your PyTorch training to work across multiple nodes.
The goal of this tutorial is to give a summary of how to write and launch PyTorch distributed data parallel jobs. We assume readers have some experience of using PyTorch to train Neural Networks, know the basics of data parallelization, and want to quickly connect the dots between executing the job on a single workstation and scaling it up across multiple nodes. With such a goal in mind, this tutorial will focus on:
- The basic idea of how PyTorch distributed data parallelism works under the hood.
- A few examples that showcase the boilerplate of PyTorch DDP training code.
- Have each example work with
torch.distributed.launch,torchrunandmpirunAPI.
Table of Content
- Distributed PyTorch Underthehood
- Write Multi-node PyTorch Distributed applications
2.1. Message Passing
2.2. ResNet Training - Launch Multi-node PyTorch Distributed Applications
3.1. torch.distributed.launch
3.2. torchrun
3.3. mpirun - Reference Performance on Lambda Cloud
Distributed PyTorch Under the Hood
The basic idea behind distributed PyTorch starts simple – create a bunch of processes that replicate a single job execution for multiple times. This is very much like any ordinary MPI jobs, e.g. mpirun -n 3 echo hello world , which replicates the job of printing "hello world" three times:
ubuntu@ubuntu-desktop:~$ mpirun -n 3 echo hello world
hello world
hello world
hello world
There are two main "tricky" parts that separate a PyTorch distributed (data parallel) training job from the above hello-world mpirun job. The PyTorch distributed training has to:
- Assign an accelerator (e.g. a GPU) to each process to maximize the computation efficiency of the forward and backward passes for each training step.
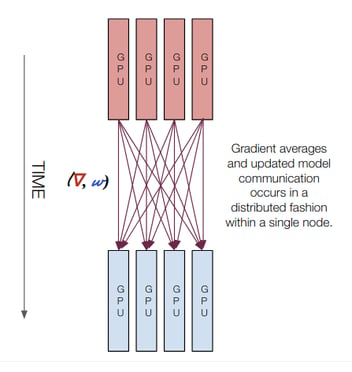
- Facilitate the communication between different processes. This happens at the end of each training step, so that the gradient can be aggregated, and the model can be updated in a synchronized fashion across all processes.
To reach these two goals, PyTorch creates a group of processes that are "device-aware" (torch.distributed.init_process_group), hook them up with fast communication backends (e.g. nccl), and prepare your data pipeline and model implementation to work in this multi-process context (typically via the torch.utils.data.distributed.DistributedSampler and the torch.nn.parallel.DistributedDataParallel APIs)
As it will become much clearer later, a few environment variables are used to glue everything together: WORLD_SIZE, WORLD_RANK and LOCAL_RANK. Think them as fancy names for "total number of GPUs in your cluster", "the ID of a GPU at the cluster level", and "the ID of a GPU at a node level". As you might guess, they are the identifications of the processes so to keep them communicating with each other during the life span of your training job.
Write Multi-node PyTorch Distributed Applications
Next we show a couple of examples of writing distributed PyTorch applications across multiple nodes. We will start with a simple message passing example, and explain how PyTorch DDP leverages environment variables to create processes across multiple nodes. We will then discuss how to generalize the practice to a more complicated use case (ResNet training).
This blog uses two 2xA6000 Lambda Cloud instances for demonstration. But the same procedure generalizes to on-prem clusters with more than two inter-connected baremetal servers, for example an Lambda Echelon cluster.
The two 2xA6000 nodes, namely 104.171.200.62 and 104.171.200.182), allows us to have 4 workers in total (2 on each node). We will use the term "process" and "worker" interchangeably since, as far as this tutorial goes, they mean the same thing.
Message Passing
We will start with a very simple example that passes tensor between the workers. The example is inspired by an official PyTorch tutorial. We made some simplifications (so you don't have to worry about implementing multi-processing in the PyTorch code), and made it to work across multiple nodes (that is the whole point, right?).
import os
import argparse

import torch
import torch.distributed as dist

# Environment variables set by torch.distributed.launch
LOCAL_RANK = int(os.environ['LOCAL_RANK'])
WORLD_SIZE = int(os.environ['WORLD_SIZE'])
WORLD_RANK = int(os.environ['RANK'])

def run(backend):
    tensor = torch.zeros(1)

    # Need to put tensor on a GPU device for nccl backend
    if backend == 'nccl':
        device = torch.device("cuda:{}".format(LOCAL_RANK))
        tensor = tensor.to(device)

    if WORLD_RANK == 0:
        for rank_recv in range(1, WORLD_SIZE):
            dist.send(tensor=tensor, dst=rank_recv)
            print('worker_{} sent data to Rank {}\n'.format(0, rank_recv))
    else:
        dist.recv(tensor=tensor, src=0)
        print('worker_{} has received data from rank {}\n'.format(WORLD_RANK, 0))

def init_processes(backend):
    dist.init_process_group(backend, rank=WORLD_RANK, world_size=WORLD_SIZE)
    run(backend)

if __name__ == "__main__":

    parser = argparse.ArgumentParser()
    parser.add_argument("--local_rank", type=int, help="Local rank. Necessary for using the torch.distributed.launch utility.")
    parser.add_argument("--backend", type=str, default="nccl", choices=['nccl', 'gloo'])
    args = parser.parse_args()

    init_processes(backend=args.backend)
The code launches 4 workers, where worker_0 create a tensor on GPU 0 of node 104.171.200.62, and send the tensor to all other three workers. A message will be printed out once the tensor is sent out or received:
# output from node 104.171.200.62
worker_0 sent data to Rank 1
worker_0 sent data to Rank 2
worker_0 sent data to Rank 3
worker_1 has received data from rank 0

# output from node 104.171.200.182
worker_2 has received data from rank 0
worker_3 has received data from rank 0
Let's dive in to what exactly happens in the above script:
- Create a worker in the context of a group of workers, via the
dist.init_process_group(backend, rank=WORLD_RANK, world_size=WORLD_SIZE)call. The worker will be identified asworker_$WORLD_RANKamong a group of$WORLD_SIZEworkers. - Run a job (defined in the
runfunction) once the worker has been created. - Notice how
WORLD_RANKandWORLD_SIZEare used bydist.init_process_groupto create the worker, and howLOCAL_RANKis used by therunfunction to assign a GPU device to the worker. These practices make sure the workers are identifiable globally across all nodes, as well as being assigned to a valid GPU on each node. backendspecifies the libraries (nccl, gloo etc) that implement fast communication algorithms. Intuitively, PyTorch scaffolds the training procedure and creates a bunch of distributed workers, but has to rely on these libraries for accomplishing the heavy lifting of communicating between different workers.- As a side note, the
local_rankinput argument is not used in anyway by this example. We keep it here so the code is compatible with thetorch.distributed.launchAPI, which expects the script to havelocal_rankas its input argument.
At this point you must wonder where are those environment variables specified. They are created outside the above PyTorch script. We will get to how to set them later in the Launch Multi-node PyTorch Distributed Applications section. But before moving on, let's clarify the values of these variables for this example:
LOCAL_RANKdefines the ID of a worker within a node. In this example each node has only two GPUs, soLOCAL_RANKcan only be 0 or 1. Due to its local context, we can use it to specify which local GPU the worker should use, via thedevice = torch.device("cuda:{}".format(LOCAL_RANK))call.WORLD_SIZEdefines the total number of workers. We have2nodes and2 workers/node, soWORLD_SIZE=4. It is used by thedist.init_process_groupcall for creating a group of workers. In this example, we also leverage it in a for loop that makesworker_0to send the tensor to the rest of the workers.RANK(which we reassigned toWORLD_RANKfor clarity) defines the ID of a worker in the world (all nodes combined). Since theWORLD_SIZEis4, theRANK(orWORLD_RANK) can be0,1,2, or3.
ResNet Training
Now we know the basics of writing a multi-node distributed PyTorch application. Next we will analyze a very popular ResNet training code written by Lei Mao. We will not repost his entire code here, instead we will compare the common practices used in his code and the above message pass example, and highlight the extra bells and whistles for training a deep neural networks.
Common pactices for distributed PyTorch applications:
torch.distributed.init_process_group(backend="nccl"): The ResNet script uses the same function to create the workers. However,rankandworld_sizeare not specfied here. Indeed, they are optional as specified by the PyTorch documentation, with default values being the environment variablesWORLD_SIZEandRANK. So no real difference here.device = torch.device("cuda:{}".format(local_rank)): Again, local rank is used for specifying GPU device for a worker. This is the same between the ResNet script and the above message passing script.
Compared to the simple message passing example, there are some extra steps for getting a training job to work:
ddp_model = torch.nn.parallel.DistributedDataParallel(model, device_ids=[local_rank], output_device=local_rank): The ResNet script uses this common PyTorch practice to "wrap" up the ResNet model so it can be used in the DDP context.train_sampler = DistributedSampler(dataset=train_set): Another common practice to "wrap" up the dataset so it can be used in the DDP context.
That's it! All you need to do is create a group of workers (with the help of WORLD_SIZE and WORLD_RANK), assign a GPU to each of them (use LOCAL_RANK), and wrap up your model and dataset in the context of PyTorch DDP (use DistributedDataParallel and DistributedSampler)!
Launch Multi-node PyTorch Distributed Applications
So far we have talked about how to write a PyTorch DDP code so it works across multiple nodes. What we haven't touched upon is how to actually launch a multi-node distributed job. Now is the time to do so and finally unfold the mystery of how environment variables like WORLD_SIZE, WORLD_RANK and LOCAL_RANK are set.
There are different ways to “launch” applications in a distributed fashion across multiple nodes, implemented by different vendors, such as HPC veterans (Open MPI), Deep Learning framework leaders (PyTorch), or open source A.I. communities (Horovod).
The rest of the tutorial will cover how to use PyTorch’s distributed.launch and torchrun methods, as well as Open MPI’s mpirun method. We pick these two due to their popularity as well as that they can be used interchangeably and work out of the box with native PyTorch DDP implementation. We skip Horovod because it requires installing some additional package and making some changes to your PyTorch script. And in general you can achieve the same goal via mpirun without any extra work.
torch.distributed.launch
In order to torch.distributed.launch a two-node ResNet training job, you need to ssh into the two nodes and run the following commands:
# On 104.171.200.62 (the master node)
python3 -m torch.distributed.launch \
--nproc_per_node=2 --nnodes=2 --node_rank=0 \
--master_addr=104.171.200.62 --master_port=1234 \
main.py \
--backend=nccl --use_syn --batch_size=8192 --arch=resnet152

# On 104.171.200.182 (the worker node)
python3 -m torch.distributed.launch \
--nproc_per_node=2 --nnodes=2 --node_rank=1 \
--master_addr=104.171.200.62 --master_port=1234 \
main.py \
--backend=nccl --use_syn --batch_size=8192 --arch=resnet152

# Output from node 104.171.200.62
Local Rank: 0, Epoch: 0, Training ...
Local Rank: 1, Epoch: 0, Training ...

# output from node 104.171.200.182
Local Rank: 0, Epoch: 0, Training ...
Local Rank: 1, Epoch: 0, Training ...
nproc_per_noddefines the number of workers on each node. It should equal to the number of GPUs on each node. In this case,2.nnodesdefines the number of nodes. In this case,2.master_addrandmaster_portare the IP address and port for the master node. You have to set up these environment variables otherwise PyTorch DDP will complain.
The above parameters are the same for both workers. However,
node_rankdefines the rank of a node. This has to be set differently in the two commands — use0for the master node, and1for the worker node. Training will freeze if master node is not rank0.
As you might guess, torch.distributed.launch will create the WORLD_SIZE, WORLD_RANK and LOCAL_RANK environment variables for each worker, from parameters such as nproc_per_nod, nnodes and node_rank.
torchrun
Created by the PyTorch team, torchrun works similarly to torch.distributed.launch but with some extra functionalities that gracefully handle failed workers and elasticity. In fact, torchrun can work with the exact same script as torch.distributed.launch does:
# On 104.171.200.62 (the master node)
torchrun \
--nproc_per_node=2 --nnodes=2 --node_rank=0 \
--master_addr=104.171.200.62 --master_port=1234 \
main.py \
--backend=nccl --use_syn --batch_size=8192 --arch=resnet152

# On 104.171.200.182 (the worker node)
torchrun \
--nproc_per_node=2 --nnodes=2 --node_rank=1 \
--master_addr=104.171.200.62 --master_port=1234 \
main.py \
--backend=nccl --use_syn --batch_size=8192 --arch=resnet152
Notice torchrun is supported by PyTorch 1.10 or newer. It also has to be searchable in the $PATH environment variable, otherwise you will see the torchrun: command not found error. We have tested torchrun on Lambda Cloud instances by creating a virtual Python environment and install the latest 1.12.1 stable PyTorch release.
virtualenv -p /usr/bin/python3.8 venv-torchrun

. venv-torchrun/bin/activate

pip3 install torch torchvision torchaudio --extra-index-url https://download.pytorch.org/whl/cu116
mpirun
Although the above torch.distributed.launch method works "out of the box" as the native PyTorch API, one has to modify and run the launch command on each of the nodes. This is non-scalable and error-prone. Alternatively, we can launch the same job by executing an mpirun command only once from the master node.
MPI, or the Message Passing Interface, is a standardized means of exchanging messages between processes belongs to a parallel program distributed across multiple computers. In the context of our distributed PyTorch training, the "message" contains the gradient computed on each GPU, and the "exchange" process makes sure these gradients are gathered from all the GPUs, so that the weights of the networks can be updated in a synchronized way. The MPI standard was introduced in the mid 1990s and was originally optimized for HPC clusters with a large number of (primarily CPU) nodes. With the recent advance in CUDA applications and GPU clusters, new libraries such as NCCL (NVIDIA Collective Communication Library) are invented to provide faster inter-GPU communication primitives that are topology-aware (by leveraging technologies such as RDMA via RoCE or InfiniBand). In practice, NCCL can be easily integrated into MPI applications, with MPI being the "frontend" for launching the parallel job, and NCCL being the "backend" for heavy communication.
There are two main flavors of MPI implementation, OpenMPI and MPICH. Either of them will work and we will use the OpenMPI implementation in this blog. You need to install OpenMPI and NCCL before proceeding to the next step. You can skip the installation for Lambda Cloud instances, since they are included as part of the Lambda stack.
Finally, this is how to accomplish the same training job using an mpirun command from the master node:
# On 104.171.200.62 (the master node)
mpirun -np 4 \
-H 104.171.200.62:2,104.171.200.182:2 \
-x MASTER_ADDR=104.171.200.62 \
-x MASTER_PORT=1234 \
-x PATH \
-bind-to none -map-by slot \
-mca pml ob1 -mca btl ^openib \
python3 main.py --backend=nccl --use_syn --batch_size=8192 --arch=resnet152


# Output on 104.171.200.62
Local Rank: 0, Epoch: 0, Training ...
Local Rank: 1, Epoch: 0, Training ...
Local Rank: 0, Epoch: 0, Training ...
Local Rank: 1, Epoch: 0, Training ...
Local Rank: 1, Epoch: 1, Training ...
Local Rank: 0, Epoch: 1, Training ...
Local Rank: 0, Epoch: 1, Training ...
Local Rank: 1, Epoch: 1, Training ...
num_steps_per_gpu: 19, avg_step_time: 1.4266
Local Rank: 1, Epoch: 2, Training ...
num_steps_per_gpu: 19, avg_step_time: 1.4266
Local Rank: 0, Epoch: 2, Training ...
num_steps_per_gpu: 19, avg_step_time: 1.4266
Local Rank: 0, Epoch: 2, Training ...
num_steps_per_gpu: 19, avg_step_time: 1.4266
Here are some explaintions for the parameters passed to the mpirun command:
np: defines the total number of workers (the world size)H: defines the IP address and the number of workers for each node. In case the list of nodes become too long to be passed as a command parameter, one can use a hostfile instead.-bind-to none: specifies Open MPI to not bind a training process to a single CPU core (which would hurt performance).-map-by slot: allows you to have a mixture of different NUMA configurations because the default behavior is to bind to the socket.mca pml ob1 -mca btl ^openib: force the use of TCP for MPI communication. This avoids many multiprocessing issues that Open MPI has with RDMA which typically results in segmentation faults.
There are a couple of caveats when you use mpirun across multiple nodes:
- The master node needs password-less access to all the worker nodes. To make this happen is you can run
ssh-keygenon the master node, and add the generated public key to~/.ssh/authorized_keyson all the worker nodes. (e.g., paste the public key into~/.ssh/authorized_keyson a worker node, or runssh-copy-id -i master-public-key username@worker-ipif the worker node allows password login) - Similar to
torch.distributed.launch,mpirunalso creates the necessary environment variables but under different names:
LOCAL_RANK = int(os.environ['OMPI_COMM_WORLD_LOCAL_RANK'])
WORLD_SIZE = int(os.environ['OMPI_COMM_WORLD_SIZE'])
WORLD_RANK = int(os.environ['OMPI_COMM_WORLD_RANK'])
As you can see, the same PyTorch script can be used by both torch.distributed.launch and mpirun, as long as it understands which environment variables to look for the values of ranks and world size.
Reference Performance on Lambda Cloud
It is important to consider the scaling efficiency when running a distributed training job across multiple nodes. Ideally the training throughput (measured by number of images processed per second) should scale linearly with the number of GPUs. In practice this is often not the case, due to the inter-GPU communication bottleneck. This is especially the case when GPUs are distributed across different nodes.
The On-Demand Lambda Cloud instance used in this blog supports up to 100 Gbps inter-node bandwidth. We were actually able to achieve satisfactory scaling efficiency for the above ResNet152 training test for CIFAR10 data:
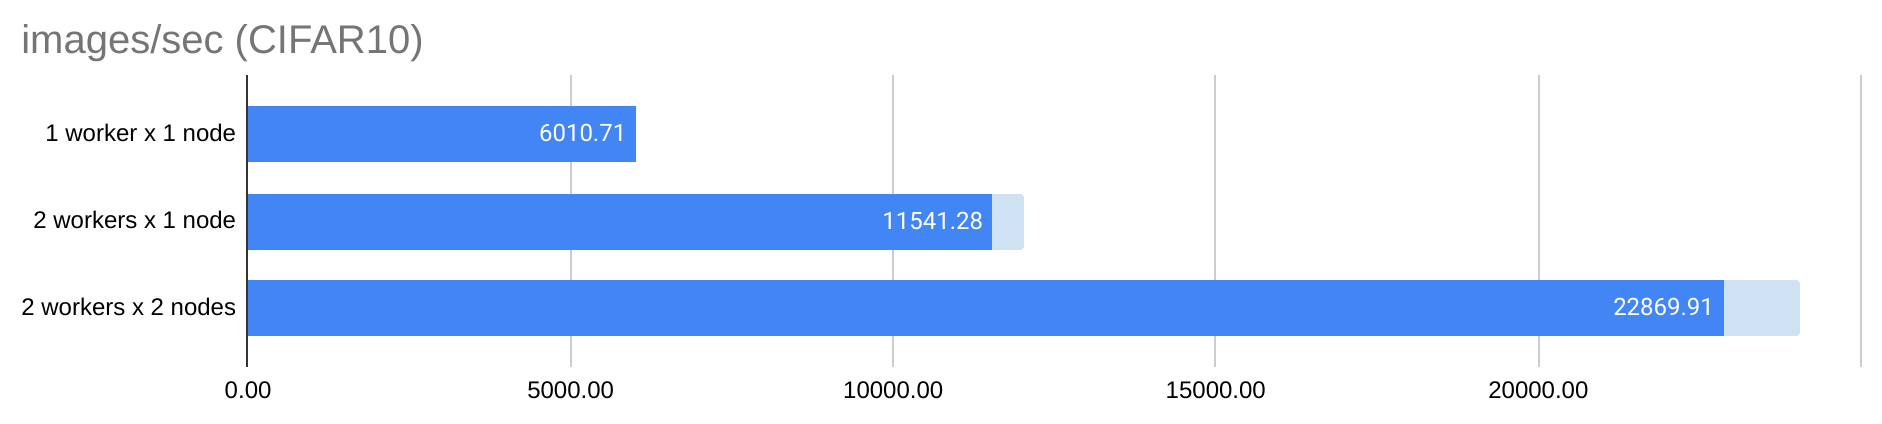
The above throughput is computed by dividing the global batch size (e.g. 8192 x 4 = 32768 ) by the reported avg_step_time (e.g. 1.4266 seconds for 2 workers x 2 nodes). The blue bar shows the training throughput almost increases linearly with the number of workers from 1 to 4 workers (across two nodes). The light blue bar at the end is the gap between the measured throughput and the theoretical throughput with the perfect scaling efficiency. Notice such efficiency was achieved using a very large batch size (in this case 8192 per GPU for CIFAR10), a heavy model (ResNet152) with only two nodes. Smaller batch size, lighter models and a larger number of nodes will require faster GPU-to-GPU communication for distributed training to become efficient. For example, Lambda's Reserved Cloud instances and Lambda Echelon Cluster (both up to 1600 Gbps inter-node bandwidth) can be great choices for such applications.
Summary
This blog gives a quick overview of how multi-node distributed PyTorch works underthehood, and how to write and launch multi-node distributed PyTorch applications.
The code for reproducing the examples can be found in this repo.